
Vendors like to claim that their software is “1-click” or installable within 30 seconds. In general these claims are pretty fatuous unless you’re either frequently deploying or looking to automate. I’ve been spending a bit of time looking at a range of storage solutions that are fully software-defined and seeing how easy that deployment process actually is. HYCU is one I’ve talked about recently, with respect to HCI backup. In this post I look at how HYCU can be installed in both VMware ESXi and Nutanix AHV environments. We will also look at the claim that a HYCU deployment is as simple as 1-2-3-4, has highlighted in this article (link).
What is HYCU?
If you’re not familiar with HYCU, the company or the product, check out my previous blog posts embedded here. HYCU is a backup solution purely deployed as software for HCI (specifically Nutanix) environments.
Version 3.0 was released last month and amongst other things, adds additional support for VMware deployment and AFS backup.
Getting The Software
HYCU images are downloaded from the HYCU website. The AHV version of HYCU 3.0 is delivered as a QEMU (qcow2) image file, while the ESXi version is comprised of an OVF installer and VMDK image. I downloaded both sets of images and uploaded to an NFS share (ESX) and image library (AHV).
HYCU Deployment – ESXi
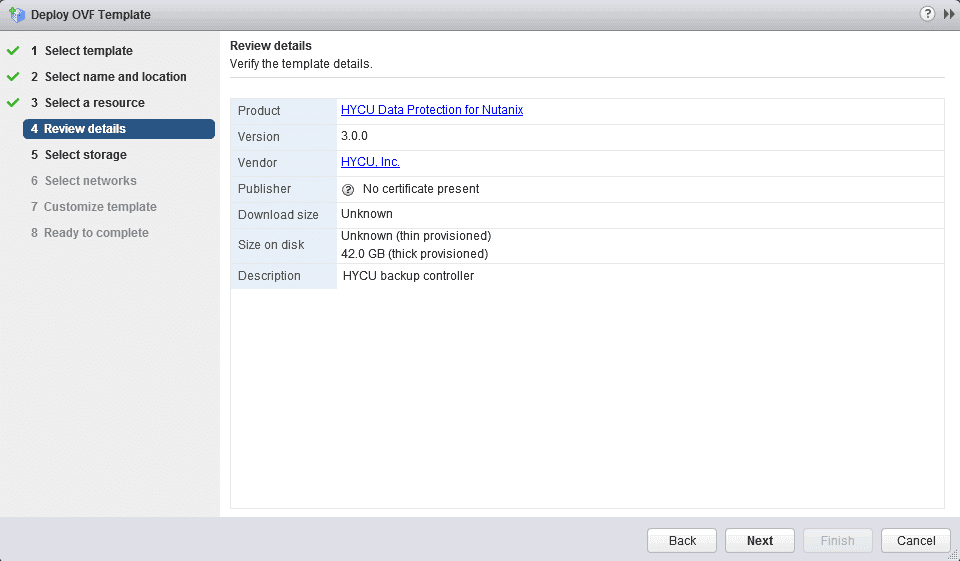
The ESXi version is installed as an OVF template. The installation requires the VM name, location, storage and networking. I decided to use PCIe storage for the deployment, which ties this VM to a specific ESXi node, however if I was doing this on a real Nutanix cluster, then the VM would be freely moveable (figures 1 & 2).

After the OVF deployment completes, the VM can be powered on and the remainder of the installation completed through the web interface.
HYCU Deployment – AHV

The AHV installation is done slightly differently. I created a new VM, cloning the boot disk from the uploaded HYCU image and adding another data disk. This was then powered up and the configuration details added (figure 3). After this, the remaining setup is done through the web interface.
Post Installation

The initial login screen requires a default user/password (“admin/admin”), after which a tutorial guides the user through the first five steps to create a backup (figure 4 & 5). These are:
- Change the admin password
- Add a Nutanix cluster (credentials required)
- Add a Target (a location for backups)
- Backup Virtual Machines
- Backup Applications (optional)

Changing password is pretty obvious as a requirement. Next we add the Nutanix Cluster. In this configuration, I’m backing up my Nutanix Community Edition running AHV, so I configure the cluster to HYCU using the settings menu (gear wheel, top right). HYCU requires URL (https://dns-or-ip-name:9440) and authorised user/password combination. For speed I’ve used my admin account, but I’d configure a dedicated account for audit purposes. Once successfully added, VMs immediately show up in the Virtual Machines tab which is accessible from the home screen.
Next I need to add a target (figure 6). A target is a location into which backups are stored. In HYCU 3, my options are AWS S3, Azure, SMB, NFS or iSCSI. I’m going to use an NFS share on a Windows machine (yes, strange, I know, but it works). In this instance I’ve opened up the NFS share already so it can be accessed by any host IP, but obviously I’d normally apply security controls onto any target.

First Backup
We’re almost at the backup stage. Policies are used with HYCU to define virtual machine and application backup requirements. By default, three standard policies are automatically configured. These are Gold (every 4 hours), Silver (every 12 hours) and Bronze (every 24 hours). In this instance, I select my test VM and assign the Gold policy. Assigning policy kicks off an initial full backup, which completes within a few minutes.

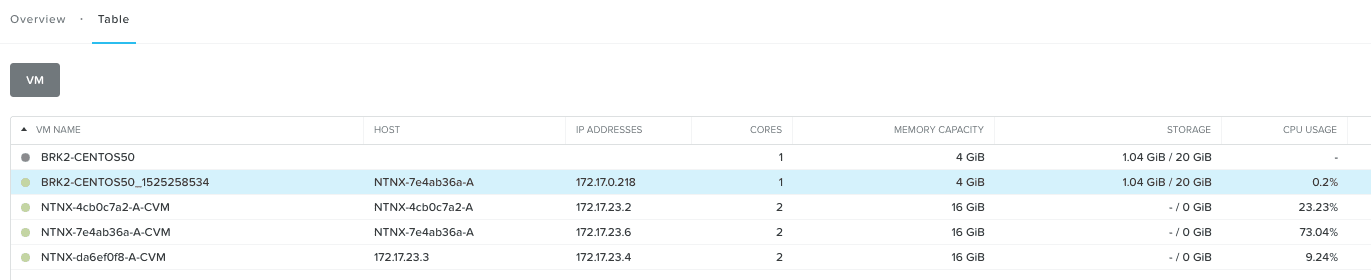
Testing a Restore
No backup has any worth until it has been tested for restore. HYCU provides the ability to restore individual files or the entire VM back into the infrastructure. This can be done either as a new VM or in place of the existing one. I restored to a clone, the results shown in Figure 8, with the restored name having one based on the original VM. The restore completed successfully and I was able to log into the VM using existing credentials.
Observations
End to end, this process realistically took about 15 minutes. I skipped on quite a few best practices that would have required some planning and additional time to configure. For instance, I’ve not discussed firewall settings. I also cut corners on the Target definition and scoping out some practical policies. However, the infrastructure build/deploy process of getting the VM in place and logging on was literally only a few minutes. Given the availability of the backup source images on either platform, building out a new backup VM was pretty simple.
4-3-2-1
So what about the 4-3-2-1 claim? HYCU (the company) says HYCU (the software) can be:
- Learned in 4 minutes
- Deployed in 3 minutes
- Achieve a recovery in 2 minutes
- Backup with 1-click
It’s a lovely marketing slogan and we like to create constructs like this for the sound byte or strap line. If you have backup knowledge (e.g. what policies, targets, schedules are) then yes, you could learn HYCU in 4 minutes. Of course mastering it would take longer. A three-minute deploy is possible with automation (next article). In reality for me, with everything in place it was a little longer than that, but manual processes like downloads get in the way. Recover in two minutes – yes, easily. Recovery is a case of clicking on the VM, choosing the recovery option and waiting for the process to complete. The longest part is waiting for data transfer. One-click backup – yes once the VM is selected. There’s a lovely big backup button to manage that.
The Architect’s View
Why does speed and simplicity matter with data protection? I’d say that it’s not just data protection that’s relevant here but any service offered on top of a private (or public) cloud infrastructure. We want to move to a position where everything is deployed as software and/or as a service. Being able to build out backup as a service and spin up instances on demand allows environments to be built that could (for example) represent an application development that runs for a few days or months. Once complete, all that remains is the backup data on an NFS share or S3 bucket. Should that test environment be required in the future it could easily be brought back.
Obviously this kind of requirement doesn’t offer the ability to span search across multiple instances, but imagine instead if each environment was a client of a managed service provider. In this scenario, the ability to segment backup would make sense and could be brought online automatically.
My follow-up post here is to see if I can automate the process of deployment to under 3 minutes. Building and running the VM should be easy. Injecting the configuration details will be a little harder, although it should be possible through the HYCU REST API. Look out for that post in the next couple of weeks.
Comments are always welcome; please read our Comments Policy. If you have any related links of interest, please feel free to add them as a comment for consideration.
Copyright (c) 2007-2020 – Post #025C – Brookend Ltd, first published on https://www.architecting.it/blog, do not reproduce without permission.
Disclaimer: HYCU, Inc is a customer of Brookend Ltd.