
StorPool Storage is a vendor of software-defined scale-out block storage that has been developing their software platform for almost ten years. In 2019, StorPool presented at Storage Field Day 18. We were impressed with the technology and wrote this post (link) covering the event and StorPool presentation.
In this series of posts, we dig further into the StorPool technology, with a hands-on and in-depth look at how the distributed storage architecture works, how it performs and how it integrates into an on-premises public cloud strategy.
Background
StorPool was founded in 2011, around the time when the IT market had seen the emergence of several private cloud competitors to VMware, including OpenStack, CloudStack and OpenNebula. The concept of hyper-converged infrastructure was gaining popularity as on-premises vendors looked to emulate the capabilities of the public cloud. Persistent storage is an important component of HCI and now containerised platforms such as Kubernetes.
The StorPool platform is a distributed, scale-out storage solution that uses commodity resources and standard server hardware. The software runs on the Linux operating system, aggregating physical HDD and SSDs into a storage pool that can be presented to either storage nodes in the cluster, client-only nodes or to other operating systems through the iSCSI protocol.
A StorPool cluster is an ideal solution for providing persistent block-based storage resources to servers running any of the platforms described, as well as traditional VMware and now containerised applications. This can be in an HCI model, or as a dedicated storage environment. The architecture is shown in figure 1.

Storage nodes create pools of aggregated storage resources in a “shared-nothing” architecture. Effectively, every node is a peer of each other with distributed management and control. Applications may be run natively on any storage node in a hyper-converged style architecture. Alternatively, the StorPool client device driver enables any Linux server to consume resources from a storage cluster, without needing to provide physical storage capacity. Non-Linux hosts, including Windows and traditional hypervisors are supported through iSCSI on the front-end network as described earlier.
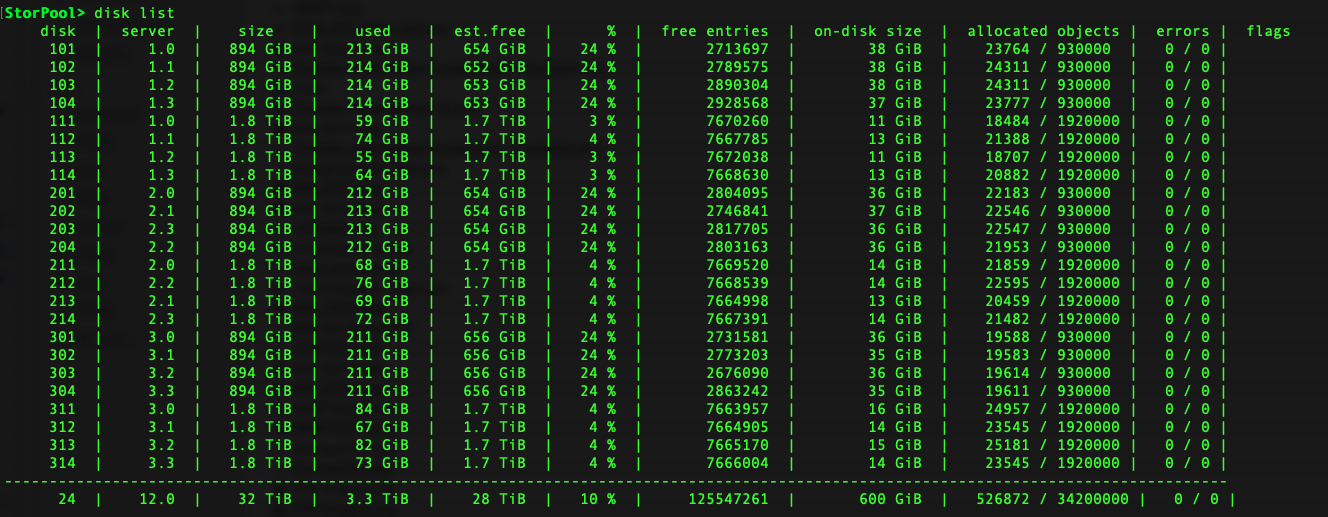
On-Disk Structures and Data Resiliency

StorPool is a block-storage solution that aggregates and virtualises physical storage resources across multiple nodes or servers. Figure 2 shows how this process is achieved. Each server has one or more local drives, which can be NVMe, SSD or HDDs. Each drive (or portions of larger drives) is mapped to a placement group, which is effectively a pool of disks. In our example, we’re showing drives mapped to a single placement group, but this isn’t a requirement. Placement Groups can have a many->one relationship with each piece of physical media.
The output from the storpool disk list CLI command is shown in figure 3, demonstrating the distributed nature of data across the available disks.
At the physical media level, each drive is divided into 32MB chunks. Chunks are then combined into replication chains to provide data resiliency, with either two or three mirrors, depending on the template chosen (more on templates in a moment). A Replication factor of three will create 3 mirrors across three independent drives and server nodes, as shown in figure 4. Replication factor of 2 uses two mirrors.

A single volume will be made up of many replication chains that disperse data across all of the physical drives in the placement groups within a template.
Templates
In many configurations, it is desirable to build logical volumes from multiple tiers of storage. StorPool provides this capability in the form of Templates. A template provides a mechanism to apply consistent attributes to a large group of logical volumes, including the replication type, placement groups, parent snapshot, IOPS and bandwidth limitations.
Template specifications can be changed once volumes have been created and are in use. The propagate parameter provides the capability to retrospectively apply the changes to all existing volumes or just use the settings for new volumes.
Templates provide an additional placement setting, allowing the mirrors of a volume to be placed on separate placement groups. The last replication mirror (as specified by the placeTail parameter) is used to service read requests. So, in our hybrid example, (shown in figure 5), data is written to both HDD and NVMe tiers, with subsequent re-reads from nvme. This could be used for backup data, for example, that gets written sequentially and read randomly.

Templates also provide the capability to create volumes from existing snapshots. In the example in figure 5, the ubuntu2004-gold template creates a volume with a maximum of 1000 IOPS, 50MB/s of bandwidth based on the ubuntu2004-gold snapshot (which is an bootable image).
Volumes
Storage is mapped to hosts through volumes. On Linux, volumes are presented as block devices to the host, either under the /dev/storpool/* directory by name, or under /dev/sp-* with sequential numbering. Support for non-Linux hosts is implemented using iSCSI. In our lab we use iSCSI LUNs exported to our VMware vSphere cluster as persistent storage. We’ll discuss more on iSCSI in subsequent posts.

Figure 6 shows the output from the storpool volume list command, with a single line for each configured volume. Further details on individual volumes is available using storpool volume status, which shows the amount of data physically stored and any rebuild activity in progress (figure 7).

Volumes can be created through any node running the CLI and API (more on those in a moment). A volume is then attached to a host, or hosts to provide data access. Volumes are attached to iSCSI targets for iSCSI remote access.
CLI & API
Throughout this post we’ve shown examples from the StorPool CLI. Administration is managed through the CLI, which can be done from any host running the StorPool software. This includes clients running with no disks and acting purely as consumers.
The CLI is extensive and can be used interactively or in batch mode. This includes the ability to pipe output for processing and to pipe commands into the storpool command. The output of commands is available in JSON, raw or CSV formats.
The CLI uses the API, which is accessible through the back-end network across all nodes. The CLI uses a shared IP address on port 81. We’ll look into the CLI and API functionality in more detail through examples and other processing tests.
Installation and Maintenance
Although many SDS solutions are available to download and run on commodity hardware, the StorPool environment is still installed and maintained directly by StorPool engineers. I’ve always questioned why this has been the case. It’s not until experiencing the full installation and management that this approach makes sense.
First, StorPool manages storage directly. Up to release 19.01.1771, this feature required a StorPool kernel module to talk to the userspace NVMe drivers. From the 19.01.1771, installations can optionally use the vfio-pci module, which looks to be the long-term solution for direct device access.
StorPool makes use of cgroups for managing CPU and memory allocations between StorPool processes and user application processes on each node. Naturally, the specific settings and division of resources is dependent on the use of the platform. HCI-type configurations will implement reserved allocations, whereas dedicated storage nodes will assign all resources to StorPool. We will look at the performance considerations in more detail in future posts.
Ensuring a successful user experience, including getting kernel dependencies right is obviously of key importance to the StorPool team. For example, in our test environment the Western Digital Gold NVMe SSDs didn’t behave as expected, so StorPool wrote a specific driver to work around the issues. This is one example that shows the benefit of the central administration process.
The Architect’s View™
This post provides an introduction to the StorPool platform, showcasing the underlying architecture and concepts of the StorPool software. In future posts we will dig deeper into the architecture. This will include
- Post 2 – Performance, QoS and system monitoring
- Post 3 – Support for Virtual Environments – VMware, KVM and cloud solutions
- Post 4 – Kubernetes and CSI support
- Post 5 – Failure modes, managing device failures and integrity checking
This work has been made possible through sponsorship from StorPool.
Copyright (c) 2007-2021 – Post #dd9d – Brookend Ltd, first published on https://www.architecting.it/blog, do not reproduce without permission.